Free Shipping on orders over $89!*
Free Shipping
on orders over $89!*


The airbrush is a tool that provides artists and artisans with enormous advantages and convenience.
From illustrators performing at the highest level of realism, to make-up artists creating HD ready seamless applications, to T-shirt artists rapidly producing of eye-popping custom designs…the possibilities of putting an airbrush to good use are endless!
Purchasing a new airbrush should be a fun and exciting experience. However, with so many models available it can also raise a lot of questions for those not in the know. This can often turn the experience into one that is a bit confusing or even overwhelming. It is a good idea to familiarize yourself with the available features and specifications of airbrushes so that you can choose with confidence.

Single Action vs Double Action
Single-Action airbrushes operate by simply pressing down on the trigger to spray both air and paint simultaneously, much like a can of spray paint. Double-Action airbrushes operate by pressing the trigger down for air and pulling back for paint (the further back the trigger is pulled the more paint is sprayed.)
Single-Action airbrushes are some what easier to learn and generally less expensive then double action models. However, they do have limitations. Contour lines and dagger stroke lines are only possible with a Double-Action airbrush. That being said if you plan on just painting solid colors or filling in stencils Single-Action may be just what you need. If you want to create fine art, T-shirt lettering, Special FX etc. it’s best to jump right in and learn airbrushing with a Double-Action airbrush.

Gravity-Feed vs Bottom-Feed vs Side-Feed
Gravity-Feed airbrushes are the most commonly used airbrushes today. These are great for detail because they provide the best paint flow by using gravity to their advantage. They also have less clogging issues due to the short path from paint reservoir to spray tip. This design also requires less PSI and CFM from a compressor or air source. We recommend gravity-feed airbrushes to most beginners because it is a bit easier to keep clean and requires a smaller investment in compressor size. Popular among illustrators, make-up artists, cake decorators etc.
Bottom-Feed (aka siphon-feed) airbrushes allow the user to change colors quickly and easily. They can also carry a lot of paint when a large bottle is attached. These work great for T-shirts, murals, temporary tattoos etc. Some artists who have developed their airbrush skills through painting T-shirts professionally, go on to use the bottle-feed style in other applications because they get so used to the feel of it and its color changing system. To each his own!
Side-Feed airbrushes are similar to bottom-feed except that the paint cup or bottle is attached to the side of the airbrush rather than the bottom. A major advantage side-feed airbrushes have is that the paint reservoir can be rotated. This allows the airbrush to be sprayed at any angle; including upside down. This design is great for projects that may require painting in odd positions such as ceilings, auto interiors or motorcycles. Some illustrators, modelers and others also like a side-feed airbrush because it does not block their line of vision the way a gravity-feed airbrush can.

Nozzle Sizes
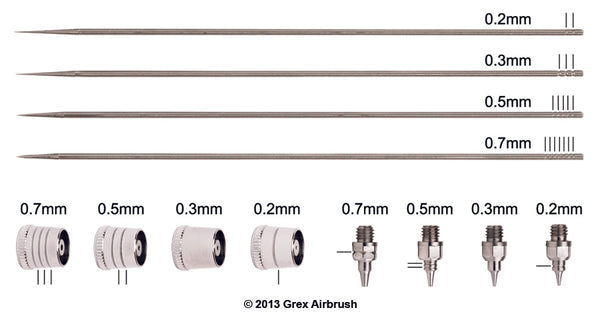
Airbrushes have the ability to produce wide spray patterns as well as lines that are as thin as a single hair. Some airbrushes are specifically designed to produced tiny details. These models will have a very small nozzle opening in the range of 0.15mm to 0.23mm. On the opposite end of the spectrum, airbrushes that have a wider spray pattern which is great for coverage and spraying thicker paints. Then there are mid-range airbrushes which cover a wide array of spray pattern sizes. If you are not sure what size you need or foresee needing a variety spray sizes you should consider an airbrush and with multiple nozzle sizes available.
Handling and Ergonomics
One of the things you will notice when using a higher end airbrush is how nice and comfortable it feels in your hand. In addition to performance and reliability it is this attention to balance and handling that makes these airbrushes much easier to use than a generic model.
Airbrush handling also comes down to a personal preference. Those who are heavy handed are more inclined to use a rugged model such as the Paasche VL or Iwata Eclipse well those with a softer touch may prefer something like the Iwata Custom Micron or the Harder Steenbeck ALplus. Artists seeking an airbrush that will minimize hand cramping and arthritic symptoms will be happy with a specially designed ergonomic airbrush like the Grex XGi or Harder Steenbeck Colani.
Preset Needle Stop Handle
The preset needle stop is a dial at the back of the airbrush handle that can be adjusted to restrict the trigger and needle from being pulled back further then needed. This feature can be helpful in preventing over spray in small detail work or in projects where precise spray patterns are needed. Well this feature is very helpful is not completely necessary for most applications.
Micro Air Control (MAC) Valve
The Micro Air Control Valve or Fine Pressure Control Valve allows you to adjust your airflow directly form your airbrush. MAC valves can be either built into the airbrush or they can be added as an accessory between the airbrush and the airline. A very handy device!
